PYNQ-Z1 基礎系列教程
PYNQ = Python + ZYNQ,即將 Xilinx ZYNQ 的部分功能 Python 化,直接使用 Python 資料庫與 FPGA硬體進行功能的開發,典型的例子便是 Digilent PYNQ Z1 開發板。 PYNQ-Z1 是 PYNQ 開源框架的硬體平台,使嵌入式程式設計人員能夠在不需設計邏輯電路的情況下,便可充分發揮 Xilinx Zynq All Programmable SoC(APSoC)的功能。 這種開發方式極大加快開發進程、縮短開發週期、降低開發難度,更方便、快捷。
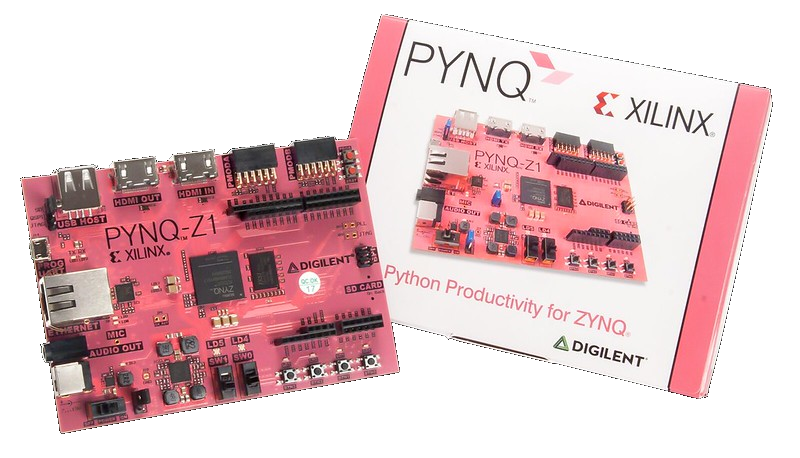
支援 PYNQ 的開發板 加速 FPGA 系統架構設計
由 Digilent 上海規劃的一系列實驗5分鐘左右的短片,每個短片教你一個 PYNQ-Z1實驗,幫你快速上手開發板。
什麼是PYNQ
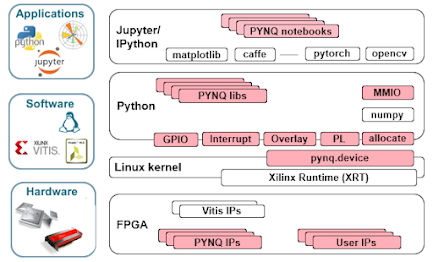
Xilinx makes Zynq and Zynq Ultrascale+™ devices, a class of programmable System on Chip (SoC) which integrates a multi-core processor (Dual-core ARM Cortex-A9 or Quad-core ARM Cortex-A53) and a Field Programmable Gate Array (FPGA) into a single integrated circuit. FPGA, or programmable logic, and microprocessors are complementary technologies for embedded systems. Each meets distinct requirements for embedded systems that the other cannot perform as well.
The main goal of PYNQ, Python Productivity for Zynq, is to make it easier for designers of embedded systems to exploit the unique benefits of Xilinx devices in their applications. Specifically, PYNQ enables architects, engineers and programmers who design embedded systems to use Zynq devices, without having to use ASIC-style design tools to design programmable logic circuits.
PYNQ使用Python進行編程
PYNQ uses Python for programming both the embedded processors and the overlays. Python is a “productivity-level” language. To date, C or C++ are the most common, embedded programming languages. In contrast, Python raises the level of programming abstraction and programmer productivity. These are not mutually-exclusive choices, however. PYNQ uses CPython which is written in C, and integrates thousands of C libraries and can be extended with optimized code written in C. Wherever practical, the more productive Python environment should be used, and whenever efficiency dictates, lower-level C code can be used.
使用 PYNQ-Z1 作為開始學習的第一步
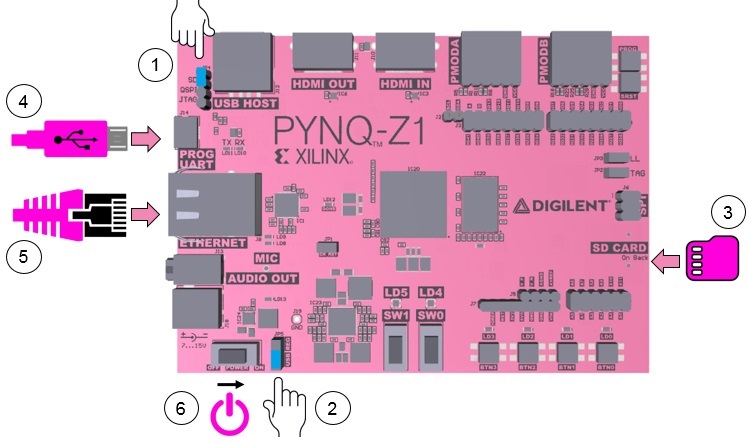
Board Setup
- Set the JP4 / Boot jumper to the SD position by placing the jumper over the top two pins of JP4 as shown in the image. (This sets the board to boot from the Micro-SD card).
- To power the PYNQ-Z1 from the micro USB cable, set the JP5 / Power jumper to the USB position. (You can also power the board from an external 12V power regulator by setting the jumper to REG.)
- Insert the Micro SD card loaded with the PYNQ-Z1 image into the Micro SD card slot underneath the board.
- Connect the USB cable to your PC/Laptop, and to the PROG - UART / J14 MicroUSB port on the board.
- Connect the board to Ethernet by following the instructions below
- Turn on the PYNQ-Z1 and check the boot sequence by following the instructions below